
Testing
CakePHP comes with comprehensive testing support built-in. CakePHP comes with integration for PHPUnit. In addition to the features offered by PHPUnit, CakePHP offers some additional features to make testing easier. This section will cover installing PHPUnit, and getting started with Unit Testing, and how you can use the extensions that CakePHP offers.
Types of Tests
A CakePHP application is usually tested on three levels:
- Unit tests test a single class, such as a model, a component, a helper or a library class, in the PHPUnit process. Fixtures fill the test database with known data. Most of your tests should be unit tests: they are fast and point directly to the code that broke.
- Controller tests dispatch a request to a controller inside the PHPUnit process with
ControllerTestCase::testAction(), without an HTTP server, and check the result, the view variables, the rendered view or the redirect. They also run in milliseconds. See Testing Controllers. - Browser end-to-end (E2E) tests start the application with a web server and use it through a real browser, including JavaScript, cookies, sessions and
SecurityComponenttokens. They are slower, so keep them for the main user flows. See E2E Testing.
This page covers unit and controller tests.
Installing PHPUnit
CakePHP uses PHPUnit as its underlying test framework. PHPUnit is the de-facto standard for unit testing in PHP. It offers a deep and powerful set of features for making sure your code does what you think it does.
CakePHP 2 is tested with PHPUnit 9.6. Install it with Composer as a development dependency by running the following in the directory that contains your composer.json:
composer require --dev phpunit/phpunit:^9.6The pieceofcake2/app skeleton already requires phpunit/phpunit in its require-dev section, so composer install is all you need there. PHPUnit is loaded through Composer's autoloader together with CakePHP, and the phpunit command is installed as vendor/bin/phpunit.
Piece of Cake 2 fork
Tests run on PHPUnit 9.6 instead of PHPUnit 3.7 (or 4.x/5.x). Lifecycle methods such as setUp() need a : void return type, and APIs removed from PHPUnit, such as PHPUnit_Framework_TestCase, staticExpects(), assertInternalType() and the @expectedException annotation, can no longer be used. See Migrating Tests to PHPUnit 9.6.
Test Database Setup
Remember to have a debug level of at least 1 in your config/core.php file before running any tests. Tests are not accessible via the web runner when debug is equal to 0. Before running any tests you should be sure to add a $test database configuration to config/database.php. This configuration is used by CakePHP for fixture tables and data:
public $test = [
    'datasource' => 'Database/Mysql',
    'persistent' => false,
    'host' => 'dbhost',
    'login' => 'dblogin',
    'password' => 'dbpassword',
    'database' => 'test_database',
];In the legacy app/ layout these files are app/Config/core.php and app/Config/database.php.
NOTE
It's a good idea to make the test database and your actual database different databases. This will prevent any embarrassing mistakes later.
Checking the Test Setup
After installing PHPUnit and setting up your $test database configuration, run PHPUnit from the root of your project:
vendor/bin/phpunitPHPUnit reads the phpunit.xml.dist file in the project root (see Running Tests). If PHPUnit starts and finishes without errors, your setup is working. As long as you haven't written any tests yet, PHPUnit simply reports that no tests were executed.
Congratulations, you are now ready to start writing tests!
Test Case Conventions
Like most things in CakePHP, test cases have some conventions. Concerning tests:
- PHP files containing tests should be in your
tests/TestCase/[Type]directories. - The filenames of these files should end in
Test.phpinstead of just .php. - The classes containing tests should extend
CakeTestCase,ControllerTestCaseorPHPUnit\Framework\TestCase. - Like other class names, the test case class names should match the filename.
RouterTest.phpshould containclass RouterTest extends CakeTestCase. - The name of any method containing a test (i.e. containing an assertion) should begin with
test, as intestPublished(). You can also use the@testannotation to mark methods as test methods.
Test cases go in tests/TestCase and fixtures in tests/Fixture, at the root of your project. CakePHP uses the tests/ directory when it exists; otherwise it falls back to the legacy app/Test/Case and app/Test/Fixture directories. See CakePHP Folder Structure for both layouts.
When you have created a test case, you can run it from the command line with PHPUnit or with the test shell:
vendor/bin/phpunit tests/TestCase/Model/PostTest.php
bin/cake test app Model/PostFor example, would run the tests for your Post model.
Creating Your First Test Case
In the following example, we'll create a test case for a very simple helper method. The helper we're going to test will be formatting progress bar HTML. Our helper looks like:
// src/View/Helper/ProgressHelper.php
class ProgressHelper extends AppHelper
{
    public function bar($value)
    {
        $width = round($value / 100, 2) * 100;

        return sprintf(
            '<div class="progress-container">
                <div class="progress-bar" style="width: %s%%"></div>
            </div>',
            $width,
        );
    }
}This is a very simple example, but it will be useful to show how you can create a simple test case. After creating and saving our helper, we'll create the test case file in tests/TestCase/View/Helper/ProgressHelperTest.php. In that file we'll start with the following:
// tests/TestCase/View/Helper/ProgressHelperTest.php
App::uses('ProgressHelper', 'View/Helper');

class ProgressHelperTest extends CakeTestCase
{
    public $Progress;

    public function setUp(): void
    {
    }

    public function testBar()
    {
    }
}CakePHP's own classes such as Controller and View are loaded by Composer's autoloader, so you only need App::uses() for your application classes.
We'll flesh out this skeleton in a minute. We've added two methods to start with. First is setUp(). This method is called before every test method in a test case class. Setup methods should initialize the objects needed for the test, and do any configuration needed. Note that setUp() must be declared with the void return type, as PHPUnit 9 requires. In our setup method we'll add the following:
public function setUp(): void
{
    parent::setUp();
    $Controller = new Controller();
    $View = new View($Controller);
    $this->Progress = new ProgressHelper($View);
}Calling the parent method is important in test cases, as CakeTestCase::setUp() does a number of things like backing up the values in Configure and, storing the paths in App.
Next, we'll fill out the test method. We'll use some assertions to ensure that our code creates the output we expect:
public function testBar()
{
    $result = $this->Progress->bar(90);
    $this->assertStringContainsString('width: 90%', $result);
    $this->assertStringContainsString('progress-bar', $result);

    $result = $this->Progress->bar(33.3333333);
    $this->assertStringContainsString('width: 33%', $result);
}The above test is a simple one but shows the potential benefit of using test cases. We use assertStringContainsString() to ensure that our helper is returning a string that contains the content we expect. If the result did not contain the expected content the test would fail, and we would know that our code is incorrect. In PHPUnit 9, assertContains() only accepts arrays and other iterables, so use assertStringContainsString() or CakePHP's assertTextContains() for strings.
By using test cases you can easily describe the relationship between a set of known inputs and their expected output. This helps you be more confident of the code you're writing as you can easily check that the code you wrote fulfills the expectations and assertions your tests make. Additionally because tests are code, they are easy to re-run whenever you make a change. This helps prevent the creation of new bugs.
Running Tests
Once you have PHPUnit installed and some test cases written, you'll want to run the test cases very frequently. It's a good idea to run tests before committing any changes to help ensure you haven't broken anything.
The recommended way to run tests is from the command line. The pieceofcake2/app skeleton contains a phpunit.xml.dist in the project root that configures PHPUnit for CakePHP:
<phpunit bootstrap="./tests/bootstrap.php"
         backupGlobals="true"
         stderr="true"
         colors="true">
    <listeners>
        <listener class="CakeFixtureInjector" file="./vendor/pieceofcake2/cakephp/src/Cake/TestSuite/Fixture/CakeFixtureInjector.php"/>
    </listeners>
    <testsuites>
        <testsuite name="All Tests">
            <directory>./tests/TestCase/</directory>
        </testsuite>
    </testsuites>
</phpunit>The bootstrap file tests/bootstrap.php defines the application paths and loads CakePHP. The CakeFixtureInjector listener creates and removes the fixtures for each test, so fixtures only work when this listener is registered. stderr="true" makes tests that use sessions work (see Running tests that use sessions). If your project doesn't have this file yet, copy it from the skeleton.
Running tests from command line
Run PHPUnit from the root of your project. Without arguments, it runs every test in tests/TestCase/. You can also pass a directory or a single file:
# Run all tests
vendor/bin/phpunit

# Run the tests in a directory
vendor/bin/phpunit tests/TestCase/Model

# Run a single test case
vendor/bin/phpunit tests/TestCase/Model/ArticleTest.phpCakePHP also provides a test shell for running tests. You can run app, core and plugin tests using the test shell. It accepts all the arguments you would expect to find on the normal PHPUnit command line tool as well. Run it from the root of your project, so that PHPUnit finds your phpunit.xml.dist:
# Run a model test in the app
bin/cake test app Model/Article

# Run a component test in a plugin
bin/cake test DebugKit Controller/Component/ToolbarComponent

# Run the configure class test in CakePHP
bin/cake test core Core/ConfigureThe test case is given as a path relative to tests/TestCase/ (or the plugin's tests/TestCase/ or Test/Case/ directory), without the Test.php suffix. In the legacy app/ layout, use vendor/bin/cake from the project root, or Console/cake from the app directory, instead of bin/cake.
NOTE
If you are running tests that interact with the session it's generally a good idea to use the --stderr option. This will fix issues with tests failing because of headers_sent warnings. The skeleton's phpunit.xml.dist already sets stderr="true".
Changed in version 2.1
The test shell was added in 2.1. The 2.0 testsuite shell is still available but the new syntax is preferred.
When you run the test shell with only a category, such as bin/cake test app, it lists the available test cases and lets you choose which one to run. The test cases are listed from tests/TestCase/ of the app or plugin, or from the legacy Test/Case/ directory when tests/TestCase/ does not exist.
Filtering test cases
When you have larger test cases, you will often want to run a subset of the test methods when you are trying to work on a single failing case. With the CLI runner you can use an option to filter test methods:
vendor/bin/phpunit tests/TestCase/Model/ArticleTest.php --filter testPublished
bin/cake test core Console/ConsoleOutput --filter testWriteArrayThe filter parameter is used as a case-sensitive regular expression for filtering which test methods to run.
Generating code coverage
You can generate code coverage reports from the command line using PHPUnit's built-in code coverage tools. Code coverage requires the Xdebug (in coverage mode) or PCOV extension. PHPUnit will generate a set of static HTML files containing the coverage results. You can generate coverage for a test case by doing the following:
vendor/bin/phpunit tests/TestCase/Model/ArticleTest.php --coverage-html tmp/coverage
bin/cake test app Model/Article --coverage-html tmp/coverageThis will put the coverage results in the tmp/coverage directory. Open tmp/coverage/index.html in your browser to view them. The skeleton's phpunit.xml.dist limits the coverage report to the files in src/.
Running tests that use sessions
When running tests on the command line that use sessions you'll need to include the --stderr flag (or stderr="true" in phpunit.xml.dist). Failing to do so will cause sessions to not work. PHPUnit outputs test progress to stdout by default, this causes PHP to assume that headers have been sent which prevents sessions from starting. By switching PHPUnit to output on stderr, this issue is avoided.
Running tests from a browser
CakePHP also provides a web interface for running tests, so you can execute your tests through a browser if you're more comfortable in that environment. The web runner is the webroot/test.php file, next to index.php; the pieceofcake2/app skeleton includes it. You can access it by going to http://localhost/your_app/test.php. It is only available when debug is 1 or higher.
Once you've loaded up the test runner, you can navigate App, Core and Plugin test suites. Clicking an individual test case will run that test and display the results. The test cases are listed from the same directories as in the test shell. You can also run a test case by giving it in the URL, for example http://localhost/your_app/test.php?case=Model/Article.
The web runner is kept mainly for compatibility. Prefer the command line, which uses your phpunit.xml.dist and is what CI systems use.
Viewing code coverage
If you have Xdebug installed, you can view code coverage results. Code coverage is useful for telling you what parts of your code your tests do not reach. Coverage is useful for determining where you should add tests in the future, and gives you one measurement to track your testing progress with.
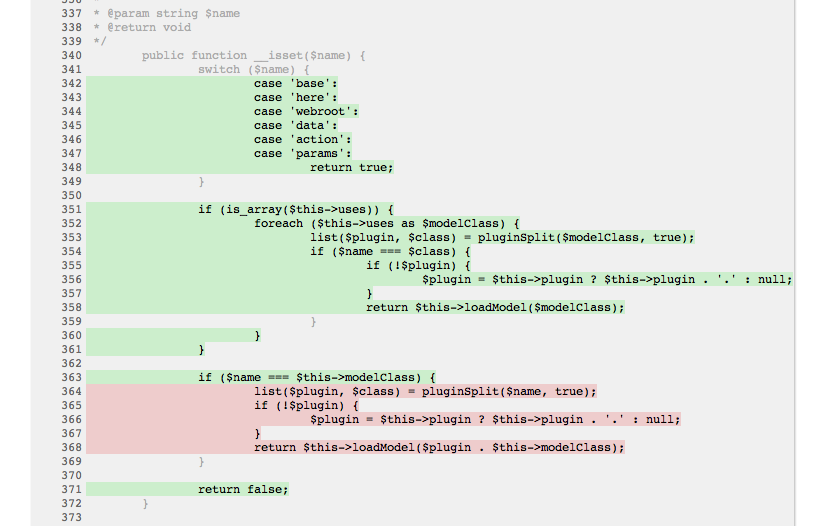
The inline code coverage uses green lines to indicate lines that have been run. If you hover over a green line a tooltip will indicate which tests covered the line. Lines in red did not run, and have not been exercised by your tests. Grey lines are considered unexecutable code by Xdebug.
Test Case Lifecycle Callbacks
Test cases have a number of lifecycle callbacks you can use when doing testing:
setUpis called before every test method. Should be used to create the objects that are going to be tested, and initialize any data for the test. Always remember to callparent::setUp()tearDownis called after every test method. Should be used to cleanup after the test is complete. Always remember to callparent::tearDown().setUpBeforeClassis called once before test methods in a case are started. This method must be static.tearDownAfterClassis called once after test methods in a case are started. This method must be static.
PHPUnit 9 declares these methods with a void return type, and your overrides must declare it too, otherwise PHP raises a fatal error:
public function setUp(): void
public function tearDown(): void
public static function setUpBeforeClass(): void
public static function tearDownAfterClass(): voidFixtures
When testing code that depends on models and the database, one can use fixtures as a way to generate temporary data tables loaded with sample data that can be used by the test. The benefit of using fixtures is that your test has no chance of disrupting live application data. In addition, you can begin testing your code prior to actually developing live content for an application.
CakePHP uses the connection named $test in your config/database.php configuration file. If this connection is not usable, an exception will be raised and you will not be able to use database fixtures.
CakePHP performs the following during the course of a fixture based test case:
- Creates tables for each of the fixtures needed.
- Populates tables with data, if data is provided in fixture.
- Runs test methods.
- Empties the fixture tables.
- Removes fixture tables from database.
These steps are performed by the CakeFixtureInjector listener, which must be registered in your phpunit.xml.dist as shown in Running Tests.
Creating fixtures
When creating a fixture you will mainly define two things: how the table is created (which fields are part of the table), and which records will be initially populated to the table. Let's create our first fixture, that will be used to test our own Article model. Create a file named ArticleFixture.php in your tests/Fixture directory, with the following content:
// tests/Fixture/ArticleFixture.php
class ArticleFixture extends CakeTestFixture
{
    // Optional.
    // Set this property to load fixtures to a different test datasource
    public $useDbConfig = 'test';
    public $fields = [
        'id' => ['type' => 'integer', 'key' => 'primary'],
        'title' => [
            'type' => 'string',
            'length' => 255,
            'null' => false,
        ],
        'body' => 'text',
        'published' => [
            'type' => 'integer',
            'default' => '0',
            'null' => false,
        ],
        'created' => 'datetime',
        'updated' => 'datetime',
    ];
    public $records = [
        [
            'id' => 1,
            'title' => 'First Article',
            'body' => 'First Article Body',
            'published' => '1',
            'created' => '2007-03-18 10:39:23',
            'updated' => '2007-03-18 10:41:31',
        ],
        [
            'id' => 2,
            'title' => 'Second Article',
            'body' => 'Second Article Body',
            'published' => '1',
            'created' => '2007-03-18 10:41:23',
            'updated' => '2007-03-18 10:43:31',
        ],
        [
            'id' => 3,
            'title' => 'Third Article',
            'body' => 'Third Article Body',
            'published' => '1',
            'created' => '2007-03-18 10:43:23',
            'updated' => '2007-03-18 10:45:31',
        ],
    ];
}The $useDbConfig property defines the datasource of which the fixture will use. If your application uses multiple datasources, you should make the fixtures match the model's datasources but prefixed with test_. For example if your model uses the mydb datasource, your fixture should use the test_mydb datasource. If the test_mydb connection doesn't exist, your models will use the default test datasource. Fixture datasources must be prefixed with test to reduce the possibility of accidentally truncating all your application's data when running tests.
We use $fields to specify which fields will be part of this table, and how they are defined. The format used to define these fields is the same used with CakeSchema. The keys available for table definition are:
type
CakePHP internal data type. Currently supported:
string: maps toVARCHARtext: maps toTEXTbiginteger: maps toBIGINTsmallinteger: maps toSMALLINTtinyinteger: maps toTINYINTorSMALLINTdepending on the database platform.integer: maps toINTfloat: maps toFLOATdecimal: maps toDECIMALdatetime: maps toDATETIMEtimestamp: maps toTIMESTAMPtime: maps toTIMEdate: maps toDATEbinary: maps toBLOBboolean: maps toBOOLEAN(orTINYINT(1)on MySQL).
key
Set to primary to make the field AUTO_INCREMENT, and a PRIMARY KEY for the table.
length
Set to the specific length the field should take.
null
Set to either true (to allow NULLs) or false (to disallow NULLs).
default
Default value the field takes.
We can define a set of records that will be populated after the fixture table is created. The format is fairly straight forward, $records is an array of records. Each item in $records should be a single row. Inside each row, should be an associative array of the columns and values for the row. Just keep in mind that each record in the $records array must have a key for every field specified in the $fields array. If a field for a particular record needs to have a null value, just specify the value of that key as null.
Dynamic data and fixtures
Since records for a fixture are declared as a class property, you cannot easily use functions or other dynamic data to define fixtures. To solve this problem, you can define $records in the init() function of your fixture. For example if you wanted all the created and updated timestamps to reflect today's date you could do the following:
class ArticleFixture extends CakeTestFixture
{
    public $fields = [
        'id' => ['type' => 'integer', 'key' => 'primary'],
        'title' => ['type' => 'string', 'length' => 255, 'null' => false],
        'body' => 'text',
        'published' => ['type' => 'integer', 'default' => '0', 'null' => false],
        'created' => 'datetime',
        'updated' => 'datetime',
    ];

    public function init()
    {
        $this->records = [
            [
                'id' => 1,
                'title' => 'First Article',
                'body' => 'First Article Body',
                'published' => '1',
                'created' => date('Y-m-d H:i:s'),
                'updated' => date('Y-m-d H:i:s'),
            ],
        ];
        parent::init();
    }
}When overriding init() just remember to always call parent::init().
NOTE
Please note that fixtures in 2.x do not handle foreign key constraints.
Importing table information and records
Your application may have already working models with real data associated to them, and you might decide to test your application with that data. It would be then a duplicate effort to have to define the table definition and/or records on your fixtures. Fortunately, there's a way for you to define that table definition and/or records for a particular fixture come from an existing model or an existing table.
Let's start with an example. Assuming you have a model named Article available in your application (that maps to a table named articles), change the example fixture given in the previous section (tests/Fixture/ArticleFixture.php) to:
class ArticleFixture extends CakeTestFixture
{
    public $import = 'Article';
}This statement tells the test suite to import your table definition from the table linked to the model called Article. You can use any model available in your application. The statement will only import the Article schema, and does not import records. To import records you can do the following:
class ArticleFixture extends CakeTestFixture
{
    public $import = ['model' => 'Article', 'records' => true];
}If on the other hand you have a table created but no model available for it, you can specify that your import will take place by reading that table information instead. For example:
class ArticleFixture extends CakeTestFixture
{
    public $import = ['table' => 'articles'];
}Will import table definition from a table called 'articles' using your CakePHP database connection named 'default'. If you want to use a different connection use:
class ArticleFixture extends CakeTestFixture
{
    public $import = ['table' => 'articles', 'connection' => 'other'];
}Since it uses your CakePHP database connection, if there's any table prefix declared it will be automatically used when fetching table information. The two snippets above do not import records from the table. To force the fixture to also import its records, change the import to:
class ArticleFixture extends CakeTestFixture
{
    public $import = ['table' => 'articles', 'records' => true];
}You can naturally import your table definition from an existing model/table, but have your records defined directly on the fixture as it was shown on previous section. For example:
class ArticleFixture extends CakeTestFixture
{
    public $import = 'Article';
    public $records = [
        [
            'id' => 1,
            'title' => 'First Article',
            'body' => 'First Article Body',
            'published' => '1',
            'created' => '2007-03-18 10:39:23',
            'updated' => '2007-03-18 10:41:31',
        ],
        [
            'id' => 2,
            'title' => 'Second Article',
            'body' => 'Second Article Body',
            'published' => '1',
            'created' => '2007-03-18 10:41:23',
            'updated' => '2007-03-18 10:43:31',
        ],
        [
            'id' => 3,
            'title' => 'Third Article',
            'body' => 'Third Article Body',
            'published' => '1',
            'created' => '2007-03-18 10:43:23',
            'updated' => '2007-03-18 10:45:31',
        ],
    ];
}Loading fixtures in your test cases
After you've created your fixtures, you'll want to use them in your test cases. In each test case you should load the fixtures you will need. You should load a fixture for every model that will have a query run against it. To load fixtures you define the $fixtures property in your model:
class ArticleTest extends CakeTestCase
{
    public $fixtures = ['app.article', 'app.comment'];
}The above will load the Article and Comment fixtures from the application's tests/Fixture directory. You can also load fixtures from CakePHP core, or plugins:
class ArticleTest extends CakeTestCase
{
    public $fixtures = ['plugin.debug_kit.article', 'core.comment'];
}Using the core prefix will load fixtures from CakePHP, and using a plugin name as the prefix, will load the fixture from the named plugin.
You can control when your fixtures are loaded by setting CakeTestCase::$autoFixtures to false and later load them using CakeTestCase::loadFixtures():
class ArticleTest extends CakeTestCase
{
    public $fixtures = ['app.article', 'app.comment'];
    public $autoFixtures = false;

    public function testMyFunction()
    {
        $this->loadFixtures('Article', 'Comment');
    }
}As of 2.5.0, you can load fixtures in subdirectories. Using multiple directories can make it easier to organize your fixtures if you have a larger application. To load fixtures in subdirectories, simply include the subdirectory name in the fixture name:
class ArticleTest extends CakeTestCase
{
    public $fixtures = ['app.blog/article', 'app.blog/comment'];
}In the above example, both fixtures would be loaded from tests/Fixture/blog/.
Changed in version 2.5
As of 2.5.0 you can load fixtures in subdirectories.
Testing Models
Let's say we already have our Article model defined on src/Model/Article.php, which looks like this:
// src/Model/Article.php
class Article extends AppModel
{
    public function published($fields = null)
    {
        $params = [
            'conditions' => [
                $this->name . '.published' => 1,
            ],
            'fields' => $fields,
        ];

        return $this->find('all', $params);
    }
}We now want to set up a test that will use this model definition, but through fixtures, to test some functionality in the model. CakePHP test suite loads a very minimum set of files (to keep tests isolated), so we have to start by loading our model - in this case the Article model which we already defined.
Let's now create a file named ArticleTest.php in your tests/TestCase/Model directory, with the following contents:
// tests/TestCase/Model/ArticleTest.php
App::uses('Article', 'Model');

class ArticleTest extends CakeTestCase
{
    public $fixtures = ['app.article'];
}In our test cases' variable $fixtures we define the set of fixtures that we'll use. You should remember to include all the fixtures that will have queries run against them.
NOTE
You can override the test model database by specifying the $useDbConfig property. Ensure that the relevant fixture uses the same value so that the table is created in the correct database.
Creating a test method
Let's now add a method to test the function published() in the Article model. Edit the file tests/TestCase/Model/ArticleTest.php so it now looks like this:
// tests/TestCase/Model/ArticleTest.php
App::uses('Article', 'Model');

class ArticleTest extends CakeTestCase
{
    public $fixtures = ['app.article'];
    public $Article;

    public function setUp(): void
    {
        parent::setUp();
        $this->Article = ClassRegistry::init('Article');
    }

    public function testPublished()
    {
        $result = $this->Article->published(['id', 'title']);
        $expected = [
            ['Article' => ['id' => 1, 'title' => 'First Article']],
            ['Article' => ['id' => 2, 'title' => 'Second Article']],
            ['Article' => ['id' => 3, 'title' => 'Third Article']],
        ];

        $this->assertEquals($expected, $result);
    }
}You can see we have added a method called testPublished(). We start by creating an instance of our Article model, and then run our published() method. In $expected we set what we expect should be the proper result (that we know since we have defined which records are initially populated to the article table.) We test that the result equals our expectation by using the assertEquals method. See the Running Tests section for more information on how to run your test case.
NOTE
When setting up your Model for testing be sure to use ClassRegistry::init('YourModelName'); as it knows to use your test database connection.
Mocking model methods
There will be times you'll want to mock methods on models when testing them. You should use getMockForModel to create testing mocks of models. It avoids issues with reflected properties that normal mocks have, and makes the mock use your test database connection:
public function testSendingEmails()
{
    $model = $this->getMockForModel('EmailVerification', ['send']);
    $model->expects($this->once())
        ->method('send')
        ->willReturn(true);

    $model->verifyEmail('test@example.com');
}The signature is getMockForModel($model, $methods = [], $config = []). Only the methods listed in $methods are replaced; when it is empty, all methods are replaced with stubs that return null.
Added in version 2.3
CakeTestCase::getMockForModel() was added in 2.3.
Mock objects and expected exceptions
For other classes, use PHPUnit's own APIs. createMock() replaces all methods of a class, and getMockBuilder() lets you choose which methods to replace and how the object is constructed:
public function testNotify()
{
    $transport = $this->createMock(MailTransport::class);
    $transport->expects($this->once())
        ->method('send')
        ->willReturn(['headers' => '', 'message' => '']);

    $request = $this->getMockBuilder(CakeRequest::class)
        ->onlyMethods(['is'])
        ->getMock();
    $request->method('is')->willReturn(true);

    // ...
}CakeTestCase still provides the older getMock($originalClassName, $methods = [], array $arguments = [], ...) method, built on top of getMockBuilder(), so existing tests keep working. It is deprecated; use createMock() or getMockBuilder() in new tests. Mock objects are instances of PHPUnit\Framework\MockObject\MockObject, which is useful for type hints in your test cases.
To test that code throws an exception, call expectException() before the code that throws it. The @expectedException annotation is no longer supported:
public function testInvalidKey()
{
    $this->expectException(ConfigureException::class);
    $this->expectExceptionMessage('Invalid key');

    // Code that throws the exception
}Testing Controllers
While you can test controller classes in a similar fashion to Helpers, Models, and Components, CakePHP offers a specialized ControllerTestCase class. Using this class as the base class for your controller test cases allows you to use testAction() for simpler test cases. ControllerTestCase allows you to easily mock out components and models, as well as potentially difficult to test methods like Controller::redirect().
Say you have a typical Articles controller, and its corresponding model. The controller code looks like:
// src/Controller/ArticlesController.php
App::uses('AppController', 'Controller');

class ArticlesController extends AppController
{
    public $helpers = ['Form', 'Html'];

    public function index($short = null)
    {
        if (!empty($this->request->data)) {
            $this->Article->save($this->request->data);
        }
        if (!empty($short)) {
            $result = $this->Article->find('all', ['id', 'title']);
        } else {
            $result = $this->Article->find('all');
        }

        if (isset($this->params['requested'])) {
            return $result;
        }

        $this->set('title', 'Articles');
        $this->set('articles', $result);
    }
}Create a file named ArticlesControllerTest.php in your tests/TestCase/Controller directory and put the following inside:
// tests/TestCase/Controller/ArticlesControllerTest.php
class ArticlesControllerTest extends ControllerTestCase
{
    public $fixtures = ['app.article'];

    public function testIndex()
    {
        $result = $this->testAction('/articles/index');
        debug($result);
    }

    public function testIndexShort()
    {
        $result = $this->testAction('/articles/index/short');
        debug($result);
    }

    public function testIndexShortGetRenderedHtml()
    {
        $result = $this->testAction(
            '/articles/index/short',
            ['return' => 'contents'],
        );
        debug($result);
    }

    public function testIndexShortGetViewVars()
    {
        $result = $this->testAction(
            '/articles/index/short',
            ['return' => 'vars'],
        );
        debug($result);
    }

    public function testIndexPostData()
    {
        $data = [
            'Article' => [
                'user_id' => 1,
                'published' => 1,
                'slug' => 'new-article',
                'title' => 'New Article',
                'body' => 'New Body',
            ],
        ];
        $result = $this->testAction(
            '/articles/index',
            ['data' => $data, 'method' => 'post'],
        );
        debug($result);
    }
}This example shows a few of the ways you can use testAction to test your controllers. The first parameter of testAction should always be the URL you want to test. CakePHP will create a request and dispatch the controller and action. Note that PHPUnit marks tests without any assertions as risky; in your own tests, replace the debug() calls with assertions.
When testing actions that contain redirect() and other code following the redirect it is generally a good idea to return when redirecting. The reason for this, is that redirect() is mocked in testing, and does not exit like normal. And instead of your code exiting, it will continue to run code following the redirect. For example:
App::uses('AppController', 'Controller');

class ArticlesController extends AppController
{
    public function add()
    {
        if ($this->request->is('post')) {
            if ($this->Article->save($this->request->data)) {
                $this->redirect(['action' => 'index']);
            }
        }
        // more code
    }
}When testing the above code, you will still run // more code even when the redirect is reached. Instead, you should write the code like:
App::uses('AppController', 'Controller');

class ArticlesController extends AppController
{
    public function add()
    {
        if ($this->request->is('post')) {
            if ($this->Article->save($this->request->data)) {
                return $this->redirect(['action' => 'index']);
            }
        }
        // more code
    }
}In this case // more code will not be executed as the method will return once the redirect is reached.
Simulating GET requests
As seen in the testIndexPostData() example above, you can use testAction() to test POST actions as well as GET actions. By supplying the data key, the request made to the controller will be POST. By default all requests will be POST requests. You can simulate a GET request by setting the method key:
public function testAdding()
{
    $data = [
        'Post' => [
            'title' => 'New post',
            'body' => 'Secret sauce',
        ],
    ];
    $this->testAction('/posts/add', ['data' => $data, 'method' => 'get']);
    // some assertions.
}The data key will be used as query string parameters when simulating a GET request.
Choosing the return type
You can choose from a number of ways to inspect the success of your controller action. Each offers a different way to ensure your code is doing what you expect:
varsGet the set view variables.viewGet the rendered view, without a layout.contentsGet the rendered view including the layout.resultGet the return value of the controller action. Useful for testing requestAction methods.
The default value is result. As long as your return type is not result you can also access the various other return types as properties in the test case:
public function testIndex()
{
    $this->testAction('/posts/index');
    $this->assertIsArray($this->vars['posts']);
}Using mocks with testAction
There will be times when you want to replace components or models with either partially mocked objects or completely mocked objects. You can do this by using ControllerTestCase::generate(). generate() takes the hard work out of generating mocks on your controller. If you decide to generate a controller to be used in testing, you can generate mocked versions of its models and components along with it:
$Posts = $this->generate('Posts', [
    'methods' => [
        'isAuthorized',
    ],
    'models' => [
        'Post' => ['save'],
    ],
    'components' => [
        'RequestHandler' => ['isPut'],
        'Email' => ['send'],
        'Session',
    ],
]);The above would create a mocked PostsController, stubbing out the isAuthorized method. The attached Post model will have save() stubbed, and the attached components would have their respective methods stubbed. You can choose to stub an entire class by not passing methods to it, like Session in the example above.
Generated controllers are automatically used as the testing controller to test. To enable automatic generation, set the autoMock variable on the test case to true. If autoMock is false, your original controller will be used in the test.
The response object in the generated controller is always replaced with a mock that does not send headers. After using generate() or testAction() you can access the controller object at $this->controller.
A more complex example
In its simplest form, testAction() will run PostsController::index() on your testing controller (or an automatically generated one), including all of the mocked models and components. The results of the test are stored in the vars, contents, view, and return properties. Also available is a headers property which gives you access to the headers that would have been sent, allowing you to check for redirects:
public function testAdd()
{
    $Posts = $this->generate('Posts', [
        'components' => [
            'Session',
            'Email' => ['send'],
        ],
    ]);
    $Posts->Session
        ->expects($this->once())
        ->method('setFlash');
    $Posts->Email
        ->expects($this->once())
        ->method('send')
        ->willReturn(true);

    $this->testAction('/posts/add', [
        'data' => [
            'Post' => ['title' => 'New Post'],
        ],
    ]);
    $this->assertStringContainsString('/posts', $this->headers['Location']);
}

public function testAddGet()
{
    $this->testAction('/posts/add', [
        'method' => 'GET',
        'return' => 'contents',
    ]);
    $this->assertMatchesRegularExpression('/<html/', $this->contents);
    $this->assertMatchesRegularExpression('/<form/', $this->view);
}This example shows a slightly more complex use of the testAction() and generate() methods. First, we generate a testing controller and mock the SessionComponent. Now that the SessionComponent is mocked, we have the ability to run testing methods on it. Assuming PostsController::add() redirects us to index, sends an email and sets a flash message, the test will pass. A second test was added to do basic sanity testing when fetching the add form. We check to see if the layout was loaded by checking the entire rendered contents, and checks the view for a form tag. As you can see, your freedom to test controllers and easily mock its classes is greatly expanded with these changes.
PHPUnit cannot mock static methods. To control what a static method such as AuthComponent::user() returns, set up the data it reads instead. For example, write the logged in user to the session before calling the action:
public function testAdd()
{
    $this->generate('Posts', [
        'components' => [
            'Session',
        ],
    ]);
    CakeSession::write('Auth.User', ['id' => 2, 'username' => 'mark']);

    $this->testAction('/posts/add', ['method' => 'get']);
    // some assertions.
}Testing a JSON Responding Controller
JSON is a very friendly and common format to use when building a web service. Testing the endpoints of your web service is very simple with CakePHP. Let us begin with a simple example controller that responds in JSON:
// src/Controller/MarkersController.php
class MarkersController extends AppController
{
    public $autoRender = false;

    public function index()
    {
        $data = $this->Marker->find('first');
        $this->response->body(json_encode($data));
    }
}Now we create the file tests/TestCase/Controller/MarkersControllerTest.php and make sure our web service is returning the proper response:
// tests/TestCase/Controller/MarkersControllerTest.php
class MarkersControllerTest extends ControllerTestCase
{
    public function testIndex()
    {
        $result = $this->testAction('/markers/index.json');
        $result = json_decode($result, true);
        $expected = [
            'Marker' => ['id' => 1, 'lng' => 66, 'lat' => 45],
        ];
        $this->assertEquals($expected, $result);
    }
}Testing Views
Generally most applications will not directly test their HTML code. Doing so is often results in fragile, difficult to maintain test suites that are prone to breaking. When writing functional tests using ControllerTestCase you can inspect the rendered view content by setting the return option to 'view'. While it is possible to test view content using ControllerTestCase, more robust and maintainable integration/view testing can be accomplished using tools like Selenium webdriver.
Testing Components
Let's pretend we have a component called PagematronComponent in our application. This component helps us set the pagination limit value across all the controllers that use it. Here is our example component located in src/Controller/Component/PagematronComponent.php:
// src/Controller/Component/PagematronComponent.php
class PagematronComponent extends Component
{
    public $Controller = null;

    public function startup(Controller $controller)
    {
        parent::startup($controller);
        $this->Controller = $controller;
        // Make sure the controller is using pagination
        if (!isset($this->Controller->paginate)) {
            $this->Controller->paginate = [];
        }
    }

    public function adjust($length = 'short')
    {
        switch ($length) {
            case 'long':
                $this->Controller->paginate['limit'] = 100;
                break;
            case 'medium':
                $this->Controller->paginate['limit'] = 50;
                break;
            default:
                $this->Controller->paginate['limit'] = 20;
                break;
        }
    }
}Now we can write tests to ensure our paginate limit parameter is being set correctly by the adjust method in our component. We create the file tests/TestCase/Controller/Component/PagematronComponentTest.php:
// tests/TestCase/Controller/Component/PagematronComponentTest.php
App::uses('PagematronComponent', 'Controller/Component');

// A fake controller to test against
class PagematronControllerTest extends Controller
{
    public $paginate = null;
}

class PagematronComponentTest extends CakeTestCase
{
    public $PagematronComponent = null;
    public $Controller = null;

    public function setUp(): void
    {
        parent::setUp();
        // Setup our component and fake test controller
        $Collection = new ComponentCollection();
        $this->PagematronComponent = new PagematronComponent($Collection);
        $CakeRequest = new CakeRequest();
        $CakeResponse = new CakeResponse();
        $this->Controller = new PagematronControllerTest($CakeRequest, $CakeResponse);
        $this->PagematronComponent->startup($this->Controller);
    }

    public function testAdjust()
    {
        // Test our adjust method with different parameter settings
        $this->PagematronComponent->adjust();
        $this->assertEquals(20, $this->Controller->paginate['limit']);

        $this->PagematronComponent->adjust('medium');
        $this->assertEquals(50, $this->Controller->paginate['limit']);

        $this->PagematronComponent->adjust('long');
        $this->assertEquals(100, $this->Controller->paginate['limit']);
    }

    public function tearDown(): void
    {
        parent::tearDown();
        // Clean up after we're done
        unset($this->PagematronComponent);
        unset($this->Controller);
    }
}Testing Helpers
Since a decent amount of logic resides in Helper classes, it's important to make sure those classes are covered by test cases.
First we create an example helper to test. The CurrencyRendererHelper will help us display currencies in our views and for simplicity only has one method usd().
// src/View/Helper/CurrencyRendererHelper.php
class CurrencyRendererHelper extends AppHelper
{
    public function usd($amount)
    {
        return 'USD ' . number_format($amount, 2, '.', ',');
    }
}Here we set the decimal places to 2, decimal separator to dot, thousands separator to comma, and prefix the formatted number with 'USD' string.
Now we create our tests:
// tests/TestCase/View/Helper/CurrencyRendererHelperTest.php
App::uses('CurrencyRendererHelper', 'View/Helper');

class CurrencyRendererHelperTest extends CakeTestCase
{
    public $CurrencyRenderer = null;

    /**
     * Here we instantiate our helper
     */
    public function setUp(): void
    {
        parent::setUp();
        $Controller = new Controller();
        $View = new View($Controller);
        $this->CurrencyRenderer = new CurrencyRendererHelper($View);
    }

    /**
     * Testing the usd() function
     */
    public function testUsd()
    {
        $this->assertEquals('USD 5.30', $this->CurrencyRenderer->usd(5.30));

        // We should always have 2 decimal digits
        $this->assertEquals('USD 1.00', $this->CurrencyRenderer->usd(1));
        $this->assertEquals('USD 2.05', $this->CurrencyRenderer->usd(2.05));

        // Testing the thousands separator
        $this->assertEquals(
            'USD 12,000.70',
            $this->CurrencyRenderer->usd(12000.70),
        );
    }
}Here, we call usd() with different parameters and tell the test suite to check if the returned values are equal to what is expected.
Save this in and execute the test. You should see a green bar and messaging indicating 1 pass and 4 assertions.
Creating Test Suites
If you want several of your tests to run at the same time, you can create a test suite. A test suite is composed of several test cases. CakeTestSuite offers a few methods for easily creating test suites based on the file system. If we wanted to create a test suite for all our model tests we would create tests/TestCase/AllModelTest.php. Put the following in it:
// tests/TestCase/AllModelTest.php
class AllModelTest extends CakeTestSuite
{
    public static function suite()
    {
        $suite = new CakeTestSuite('All model tests');
        $suite->addTestDirectory(TESTS . 'TestCase/Model');

        return $suite;
    }
}The code above will group all test cases found in the tests/TestCase/Model/ folder. The TESTS constant points to your tests/ directory (or to app/Test/ in the legacy layout, where test cases are in TESTS . 'Case'). To add an individual file, use $suite->addTestFile($filename);. You can recursively add a directory for all tests using:
$suite->addTestDirectoryRecursive(TESTS . 'TestCase/Model');Would recursively add all test cases in the tests/TestCase/Model directory. You can use test suites to build a suite that runs all your application's tests:
// tests/TestCase/AllTestsTest.php
class AllTestsTest extends CakeTestSuite
{
    public static function suite()
    {
        $suite = new CakeTestSuite('All tests');
        $suite->addTestDirectoryRecursive(TESTS . 'TestCase');

        return $suite;
    }
}You can then run this test on the command line using:
bin/cake test app AllTestsWhen you run PHPUnit directly, the <testsuites> section of phpunit.xml.dist already selects the tests to run, so you don't need an AllTests suite for vendor/bin/phpunit. Be careful not to add a suite file to a directory that phpunit.xml.dist already scans, or the same tests will run twice.
Creating Tests for Plugins
Tests for plugins are created in their own directory inside the plugins folder:
plugins/
    Blog/
        tests/
            TestCase/
Fixture/Plugins can also use the legacy Test/Case and Test/Fixture directories. CakePHP uses tests/TestCase and tests/Fixture when they exist in the plugin, and falls back to Test/Case and Test/Fixture otherwise. In the legacy application layout, plugins are in app/Plugin/ instead of plugins/.
They work just like normal tests but you have to remember to use the naming conventions for plugins when importing classes. This is an example of a testcase for the BlogPost model from the plugins chapter of this manual. A difference from other tests is in the first line where 'Blog.BlogPost' is imported. You also need to prefix your plugin fixtures with plugin.blog.blog_post:
// plugins/Blog/tests/TestCase/Model/BlogPostTest.php
App::uses('BlogPost', 'Blog.Model');

class BlogPostTest extends CakeTestCase
{
    // Plugin fixtures located in plugins/Blog/tests/Fixture/
    public $fixtures = ['plugin.blog.blog_post'];
    public $BlogPost;

    public function testSomething()
    {
        // ClassRegistry makes the model use the test database connection
        $this->BlogPost = ClassRegistry::init('Blog.BlogPost');

        // do some useful test here
        $this->assertIsObject($this->BlogPost);
    }
}If you want to use plugin fixtures in the app tests you can reference them using plugin.pluginName.fixtureName syntax in the $fixtures array.
You can run a plugin's test case with the test shell, for example bin/cake test Blog Model/BlogPost.
Integration with Jenkins
Jenkins is a continuous integration server, that can help you automate the running of your test cases. This helps ensure that all your tests stay passing and your application is always ready.
Integrating a CakePHP application with Jenkins is fairly straightforward. The following assumes you've already installed Jenkins on *nix system, and are able to administer it. You also know how to create jobs, and run builds. If you are unsure of any of these, refer to the Jenkins documentation. The same steps apply to other CI services.
Create a job
Start off by creating a job for your application, and connect your repository so that jenkins can access your code. Add a shell script step that installs the dependencies, including PHPUnit:
composer install --no-interactionAdd test database config
Using a separate database just for Jenkins is generally a good idea, as it stops bleed through and avoids a number of basic problems. Once you've created a new database in a database server that jenkins can access (usually localhost). Add a shell script step to the build that contains the following:
cat > config/database.php <<'DATABASE_PHP'
<?php
class DATABASE_CONFIG
{
    public $test = [
        'datasource' => 'Database/Mysql',
        'host' => 'localhost',
        'database' => 'jenkins_test',
        'login' => 'jenkins',
        'password' => 'cakephp_jenkins',
        'encoding' => 'utf8mb4',
    ];
}
DATABASE_PHPThis ensures that you'll always have the correct database configuration that Jenkins requires. Do the same for any other configuration files you need to. It's often a good idea to drop and re-create the database before each build as well. This insulates you from chained failures, where one broken build causes others to fail. Add another shell script step to the build that contains the following:
mysql -u jenkins -pcakephp_jenkins -e 'DROP DATABASE IF EXISTS jenkins_test; CREATE DATABASE jenkins_test';Add your tests
Add another shell script step to your build. In this step run the tests for your application. Creating a junit log file, or clover coverage is often a nice bonus, as it gives you a nice graphical view of your testing results:
vendor/bin/phpunit \
    --log-junit junit.xml \
--coverage-clover clover.xmlIf you use clover coverage, or the junit results, make sure to configure those in Jenkins as well. Failing to configure those steps will mean you won't see the results.
Run a build
You should be able to run a build now. Check the console output and make any necessary changes to get a passing build.